| Page properties | |
|---|---|
|
| name | date_started |
|---|---|
| format | MMMM dd, yyyy |
|
| name | date_finished |
|---|---|
| format | MMMM dd, yyyy |
|
Prep work:
- Cut 3 14 strips of sew on velcro. These strips should have two pieces each, the latch side and the hook side. It doesn't really mater which side you call latch or hook as long and you stay consistent.
- Cut 1 14x22 piece of fabric.
I wanted my carrier to be decorated, so at this stage I sewed in ribbons to the right side of fabric. If you wanted to embroider, you should do it now before you start assembly. Note, half of the fabric will end up inside, so be mindful of where you are decorating.
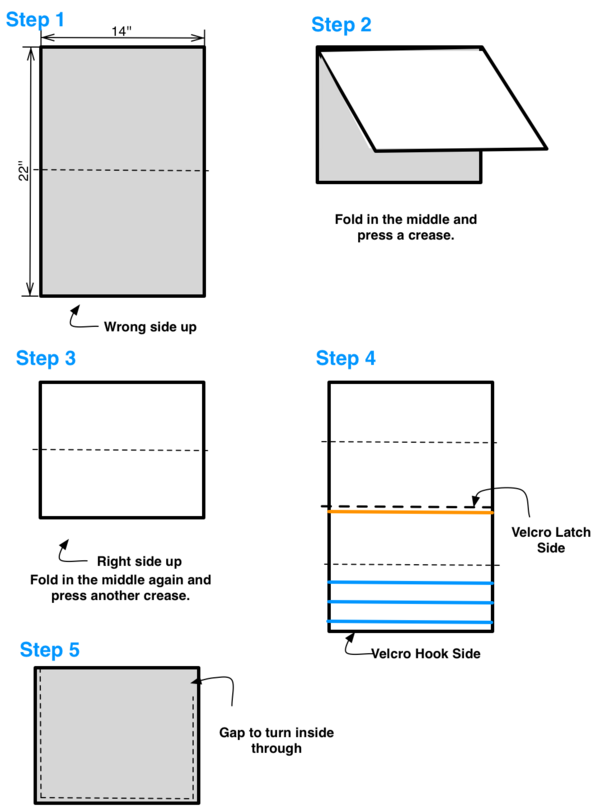
- Step 1: Place your 14x22 piece of fabric wrong side up.
- Step 2: Fold the fabric on the 22 in side in half, with the two wrong sides facing each other. Iron in a crease, which you will use later.
- Step 3: Fold the fabric again, thus folding it into forths. Iron another crease.
- Step 4: Unfold the fabric. On the bottom forth, sew on your velcro strips. The blue lines are for the hook sides and the orange line is for the latch side. When you are done, the orange will seal with the bottom blue line to close your carrier. The two middle velcros will hold the remaining 2 latch sides to hold wires into place.
- Step 5: Fold the carrier in the middle, right sides together. Now stitch around the outside, leaving a 1-2gap to turn the carrier inside out. Backstitch at both ends to seal them.
- Step 6: Turn the carrier right-side-out and hand stitch the gap shut.
- Step 7: Place the two latch strips of velcro to the two hook strips in your carrier.

